Malvern EastProject Repton , 2025
“The key thing we were looking for was the consistency in the pricing that we received, having the right team to be able to problem solve when an issue arose, they did it in a very calm and measured manner. They're a great team and we worked so well together, had we done the design with Envy it would have saved us 6 months minimum”
Home Solar Panel Installation Guide for Australians

A successful home solar panel installation starts long before a single panel hits your roof. It all begins with an honest, careful look at your property's potential. Getting this groundwork right is absolutely crucial to making sure your investment pays off with the energy savings and efficiency you're counting on.
Is Your Home Ready for Solar Panels?
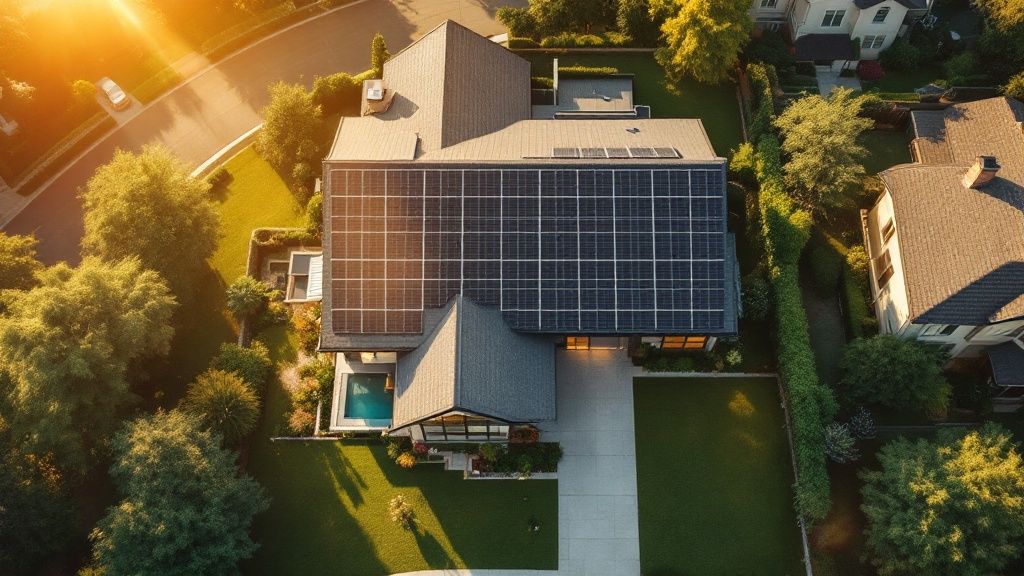
Energy efficiency of homes is at the forefront of design for the modern home. At Envy Abode, the majority of clients in Glen Iris and surrounding suburbs are opting to install a home solar panel system. During construction, we liaise with your preferred home solar power installation team to ensure a smooth process.
But before you jump in, it's essential to figure out if your home is a good candidate for solar. This goes way beyond just living in a sunny spot; it means taking a practical look at your roof, its surroundings, and your home’s existing infrastructure.
Evaluating Your Roof's Solar Potential
The number one factor for a high-performing solar system is your roof's orientation. Here in Australia, a north-facing roof is the gold standard because it cops the most direct sunlight all day long, maximising how much energy you can generate.
But don't worry, a perfect north-facing roof isn't a deal-breaker. Homes in suburbs like Glen Iris with east-west facing roofs can also be fantastic candidates. An east-west setup actually provides a more consistent stream of energy throughout the day, catching the morning sun on one side and the afternoon sun on the other. This profile often matches up perfectly with modern household energy use, which tends to peak in the mornings and late afternoons.
Beyond just the direction it's facing, you’ll want to consider these key points:
- Roof Pitch: The sweet spot for solar panels in Australia is usually an angle between 20 and 30 degrees. This pitch not only helps the panels capture the best sunlight but also lets the rain wash them clean.
- Usable Space: You need enough clear, uncluttered space on your roof to fit the number of panels your home requires. Things like vents, chimneys, and skylights can all get in the way and limit the available area.
- Roofing Material: Most common roofing materials, like metal and tile, are completely fine for a solar installation. A professional installer will use the right mounting gear to ensure everything is secure and watertight.
The Impact of Shading
Even if you have the perfect roof, shading can slash your system's output. A single shaded panel can drag down the performance of every other panel connected in its string, so a thorough shade analysis is an absolute must.
Take a stroll around your property at different times of the day—morning, noon, and late afternoon. Keep an eye out for anything that could cast a shadow on your roof.
A common oversight is forgetting about future growth. That small tree over there might not be a problem today, but in five years, it could become a major source of shade and compromise your long-term energy production. Always think about the mature height of any surrounding trees and shrubs.
Catching these issues early means your installation team can design a panel layout to minimise the impact of shade. They might also suggest solutions like microinverters, which let each panel work independently, so one shaded panel doesn't affect the others.
Structural and Electrical Readiness
Finally, your home itself needs to be up to the task. Solar panels add extra weight to your roof structure, usually around 15-20 kilograms per square metre. While most modern homes are built to handle this, an older roof might need a structural check-up to make sure it's sound. It's much better to sort out any repairs before the panels go on.
Your home's electrical system also needs to be ready. The installer will inspect your switchboard to make sure it can safely handle the new solar circuit. Sometimes, an upgrade is necessary to meet current safety standards and manage the two-way flow of electricity.
Thinking about these factors is a core part of a truly energy-efficient house design, where solar integration is planned right from the start. By ensuring your home is structurally and electrically prepared, you’re setting the stage for a safe, effective, and long-lasting home solar panel installation.
Designing a Solar System That Fits Your Life
So, you've crunched the numbers and your property is a great candidate for solar. Fantastic. Now comes the exciting part: designing a system that’s tailored specifically for your home and lifestyle. This isn't about just slapping some panels on the roof; it's about creating a mini power station that's perfectly sized for your family's needs.
The first thing we need to do is get a handle on your energy consumption. Your past electricity bills are the key here—they tell the real story of how much power you use and, just as importantly, when you use it. A deep dive into these bills helps us calculate your average daily energy needs and identify your peak usage times, which is absolutely critical for sizing your system correctly.
Decoding Your Energy Usage
To get started, you'll want to dig out your electricity bills from the last 12 months. Having a full year's worth of data is vital because it shows us the seasonal swings—think of the air conditioner working overtime in summer versus the extra lights and heating you use in winter.
Look for the total kilowatt-hour (kWh) usage on each bill. If you divide that number by the days in the billing cycle, you’ll get your daily average. It can be quite an eye-opener. For instance, a household in Glen Iris might discover they use a modest 15 kWh on an average autumn day, but that figure skyrockets to 30 kWh or more during a summer heatwave.
Understanding these peaks and troughs is vital. A system designed only for your average use might leave you drawing expensive power from the grid during peak times, which defeats a major purpose of going solar. A well-designed system will account for this variability.
Choosing the Right Panels and Inverter
Once we have a clear picture of your energy habits, we can start looking at the hardware. In Australia, the two main choices for solar panels are monocrystalline and polycrystalline.
- Monocrystalline panels are the sleek, black ones. Made from a single silicon crystal, they boast higher efficiency ratings, usually between 19% and 22%. They also perform better in low-light conditions and pack more punch in a smaller footprint, making them the go-to for homes with limited roof space.
- Polycrystalline panels have that classic blue, speckled appearance. They're made from multiple silicon fragments, which makes them a bit less efficient (16% to 18%), but they are often more budget-friendly. If you’ve got a large, clear roof, they can offer fantastic value.
The inverter is just as crucial. It's the brains of the operation, converting the DC electricity from your panels into the AC electricity that powers your home. Your choice here really comes down to your roof.
- String Inverters are the workhorse of the industry, perfect for simple, unshaded roofs where all the panels face the same direction.
- Microinverters, on the other hand, are installed on each individual panel. They're a brilliant solution for more complex roofs that have multiple angles or get patchy shade during the day, as one shaded panel won't drag down the performance of the whole system.
Getting this combination right ensures your system isn't just generating power, but doing it as efficiently as possible—a core principle of good energy design, which is central to what passive solar design is all about.
Is a Solar Battery Right for You?
The big question for many homeowners now is whether to add battery storage. A battery lets you store the excess solar energy your panels produce during the day, so you can use it at night or keep the lights on during a blackout. It’s the key to true energy independence.
Of course, adding a battery increases the upfront cost, so it's a decision that needs to align with your goals. Are you mainly looking to maximise savings by dodging those expensive evening electricity tariffs? Or is your priority having a reliable backup power source when the grid goes down?
The move towards energy storage is definitely accelerating. In a single month, July 2025, a massive 19,592 solar battery units were installed across Australia. With an average system size of 18.2 kWh, it’s clear that homeowners are opting for serious storage capacity.
By carefully considering these design elements with a professional installer, you’ll end up with a custom-built system that works for you, not a one-size-fits-all solution. This upfront planning is what separates a good solar installation from a great one—and ensures you'll be enjoying energy freedom for decades to come.
Navigating Paperwork and Choosing Your Solar Gear
Once your system design is locked in, the journey to getting solar on your roof splits into two parallel paths: sorting out the paperwork and picking the right hardware for the job. This part can feel a bit daunting, but a quality installation team will take the administrative headache off your hands, making sure your project keeps moving forward smoothly.
At Envy Abode, we know how crucial a seamless process is, especially when fitting solar into a new build. While we don't install the panels ourselves, we work hand-in-glove with your chosen solar team during construction. We ensure everything lines up perfectly, from the roof's structural readiness to the electrical pre-wiring, which helps sidestep any nasty delays down the track.
This simple graphic gives you a clear picture of the physical installation timeline.
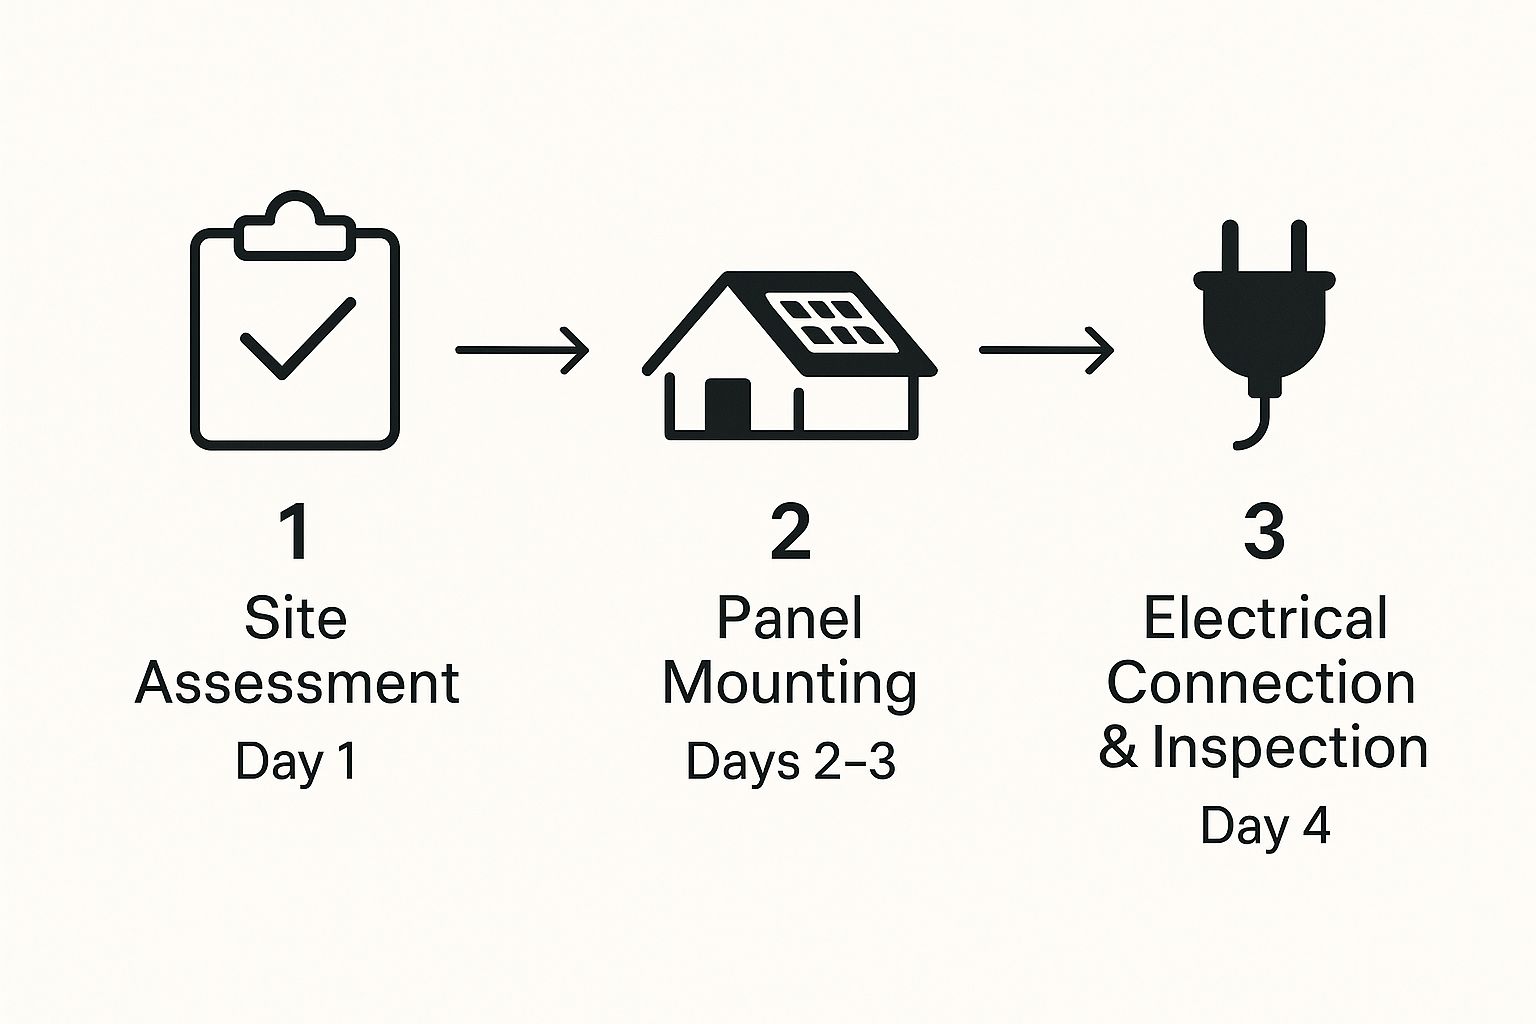
As you can see, the on-site work is often done in less than a week. The real time-consumers are the crucial paperwork and grid connection approvals that happen before and after the tools come out.
Cutting Through the Red Tape
Before a single panel is lifted, your project needs the green light from both your local council and your electricity network provider. This means submitting applications, technical drawings, and equipment specs to prove your system is up to code and meets all safety standards.
An experienced installer in the Glen Iris area will be all over the specific rules for local councils and network operators like AusNet Services or United Energy. They’ll manage this entire process for you, which is one of the biggest perks of hiring a professional.
- Council Permits: Most residential solar setups are considered "permitted developments," meaning they don't need a full-blown planning permit. However, this can change depending on your property's location, especially if it has heritage overlays.
- Grid Connection Approval: This is a non-negotiable step. Your electricity retailer has to officially approve your system's connection to the grid before installation can even be booked in.
This admin stage is where things can really get bogged down if not handled properly. For a better grasp of the local requirements, have a look at our detailed guide on how to get a building permit, which explains many of the key principles involved.
Making Sense of Solar Panel Datasheets
While the paperwork is being sorted, you can get to the exciting part—choosing the gear. Your installer will show you datasheets for the proposed panels, and knowing what to look for will empower you to make a really informed decision.
Don't just get swayed by a brand name. Instead, focus on these key metrics:
- Power Rating (Watts): This is the panel's maximum output in perfect lab conditions. A higher wattage simply means more power from a single panel.
- Efficiency (%): This tells you how well the panel converts sunlight into electricity. High-efficiency panels, typically in the 20-22% range, are fantastic for smaller roofs where you need to squeeze out every bit of power from a limited space.
- Temperature Coefficient: For our Aussie climate, this is a huge one. It shows how much the panel's output drops for every degree the temperature climbs above 25°C. A lower number is always better here, meaning the panel holds its own on those scorching summer days.
A common mistake is to only look at the peak power rating. A panel with a slightly lower wattage but a better temperature coefficient might actually generate more energy over a year in a hot climate like Melbourne’s.
When choosing your solar panels, you'll generally come across three main types. Each has its own strengths, and the best fit depends on your budget, roof space, and performance goals.
Solar Panel Technology Comparison
Feature | Monocrystalline Panels | Polocrystalline Panels | Thin-Film Panels |
Efficiency | Highest (18-22%). Great for limited roof space. | Good (15-17%). Requires more space for the same output. | Lowest (10-13%). Best for large, commercial roofs. |
Appearance | Sleek, uniform black appearance. | Blue, marbled look due to multiple silicon crystals. | Lightweight and flexible, with a uniform look. |
Cost | Most expensive due to complex manufacturing. | More affordable, a popular mid-range option. | Can be the cheapest per watt, but installation is complex. |
Performance | Excellent in high heat and low light conditions. | Slightly less efficient in high temperatures. | Performance can vary greatly with temperature. |
Ultimately, monocrystalline panels are the go-to for most Melbourne homes due to their high efficiency and sleek look, but it's always worth discussing the options with your installer.
Selecting Your Inverter and Battery
The inverter is the real brain of your solar system. It’s the device that converts the DC power from your panels into the AC power your home actually uses. In Australia, the choice usually comes down to string inverters or microinverters. Brands like Fronius and SMA are stalwarts in the string inverter world, while Enphase pretty much owns the microinverter market.
Your roof’s layout is the deciding factor here. A simple, unshaded roof is a perfect match for a reliable string inverter. But if you've got trees causing shade or panels facing different directions, microinverters will give you a much better performance.
If you’re thinking about adding a battery, top names in Australia include the Tesla Powerwall, Sonnen, and AlphaESS. When comparing them, look at the usable capacity (kWh), the warranty (in both years and cycles), and the power output, which tells you how many appliances you can run at once during a blackout.
Getting the hardware right from the start is the key to a system that performs brilliantly for decades to come.
So, What Actually Happens on Installation Day?
With the paperwork sorted and your new solar gear ready to go, the real excitement begins: installation day. This is when your home starts its transformation into a self-sufficient power station. Knowing what to expect helps you prepare and appreciate the skill that goes into a professional home solar panel installation. It’s a well-rehearsed process that turns your roof into a clean energy generator, usually in just a day or two.
The day kicks off when the installation team arrives. A typical crew is made up of a few licensed electricians and specialist roofers. They'll start with a quick on-site meeting to run through the plan, double-check the panel layout on your roof, and lock in the safety protocols for the day.
This first step is all about getting the site prepped and safe. The team will cordon off the area around your house, set up safety cones, and make sure their ladders are on solid, stable ground. For any work on a pitched roof, fall protection gear like harnesses and ropes isn't just an option—it's essential. Every team member working at height will be fully kitted out.
Laying the Foundation for Your Panels
The first big job is getting the racking system installed. This is the metal framework that’s going to hold your solar panels securely for decades to come. It’s a critical stage where absolute precision matters, especially when it comes to keeping your roof completely waterproof.
For a standard tile roof, the installers will carefully lift individual tiles to bolt L-feet directly into the roof rafters underneath. If you have a metal roof, they'll use specialized clamps that attach to the standing seams, so no new holes are needed. No matter the roof type, every single penetration point is meticulously waterproofed with high-grade flashing and industrial sealants to create a permanent, watertight seal built to last.
You can't easily see the quality of the racking installation once the panels are on top, but it's the absolute foundation of your entire system. A professional team takes real pride in making sure every mount is perfectly sealed and structurally sound, guaranteeing your roof's integrity is 100% intact.
Getting the Panels and Wiring in Place
Once the racking is locked in, the solar panels are brought up to the roof. Each panel is carefully manoeuvred onto the racks and fastened down with heavy-duty clamps designed to handle everything from high winds to wild Aussie weather.
At the same time, the electrical work gets underway. The installers will run conduit—which is basically protective piping for the wires—from the roof down to where your inverter will be installed, usually in the garage or on a convenient exterior wall.
There are a few things that separate a quality wiring job from a sloppy one:
- Tidy Cable Management: All wiring on the roof should be neatly tucked away and secured under the panels. You should never see wires left dangling where they could be damaged by UV rays or chewed on by pests.
- Smart Conduit Use: The conduit running down the side of your house should be as discreet as possible. A good installer will often paint it to match your wall for a clean, almost invisible finish.
- DC Isolators: These are crucial safety switches installed near the panels and the inverter. They allow the system to be shut down in an instant for any maintenance work, keeping everyone safe.
Connecting to Your Home's Grid
The final piece of the installation puzzle is connecting the solar system to your home’s main switchboard. A licensed electrician handles this part, running the AC cable from the inverter over to your switchboard. There, they’ll install a new, dedicated circuit breaker just for your solar system.
This is precise work that requires an expert to ensure it’s done safely and meets all Australian standards. The electrician will double-check every connection, test all the wiring, and make sure everything is clearly and correctly labelled.
For a typical home in a suburb like Glen Iris, this part of the job usually takes a few hours. It might require shutting off your main power for a short time, but the team will always give you plenty of warning before they do. Once everything is wired up, the physical work is done, and your home is officially ready for the final inspection and commissioning.
Powering Up Your Solar System
So, your solar panels are fixed to the roof, the inverter is mounted, and all the wiring is neatly tucked away. It might feel like the hard work is done, but you're not quite ready to generate your own clean energy. Before you can flip the switch, your system needs to go through a crucial final step: commissioning.
This isn't just a formality. Commissioning is a detailed series of tests and checks that guarantees your system is running at peak performance, is completely safe, and meets all strict Australian standards. Think of it as the final quality assurance check before you start reaping the rewards of solar power.

The Installer's Final Checks
The commissioning process is handled by the same qualified electricians who installed everything. They work through a meticulous checklist to verify every component, leaving no stone unturned. This is far more than just flicking a switch—it’s a methodical process to ensure everything is perfect.
First, they'll run a series of electrical tests to confirm voltages and currents are exactly where they should be. They'll double-check every connection, from the panels down to the inverter and right through to your switchboard, making sure it’s all secure and correctly configured.
Then comes the moment of truth: powering up the inverter for the first time. They’ll make sure it’s communicating properly with both the panels and the grid, confirming that your system is generating power as expected and responding correctly to grid signals.
Navigating Final Inspections and Grid Connection
Once your installer has completed their internal checks, there are two more hurdles to clear before you’re officially live. The first is a final, independent inspection by a licensed electrical inspector. This third-party verification adds another layer of safety and quality control, and it's a mandatory step to ensure your system is fully compliant with all regulations.
At the same time, your solar installer is busy submitting all the necessary compliance paperwork to your electricity retailer. This is the official notice letting them know your property is now a solar-powered home.
This final connection stage is often where a slight delay can pop up. Your energy retailer needs to process the paperwork and may have to send a technician to reconfigure or replace your electricity meter with one that can measure both the power you draw from the grid and the excess solar you send back.
This new "smart meter" is what allows you to earn feed-in tariff credits for any surplus energy your system generates.
Tracking Your System's Performance
Congratulations! The meter is installed, and you’ve been given the official green light. Your home is now running on sunshine. This is when you get to download your system's monitoring app and see your investment working in real-time. Modern inverters connect to your home Wi-Fi, constantly sending data right to your phone or computer.
This isn't just a cool feature; it’s a powerful tool for managing your energy. You can:
- See Your Live Production: Watch exactly how much electricity your panels are generating at any given moment.
- Track Your Consumption: Get a clear picture of how much power your home is using and pinpoint your peak usage times.
- Monitor Savings: View daily, weekly, and monthly reports on your energy savings and how much power you've exported.
You’re now part of a massive shift in Australian energy. Rooftop solar is booming, with over 4.1 million systems expected to be running by early 2025, powering more than 32.3% of Australian homes. By monitoring your system, you’re not just tracking savings—you’re managing your own personal power station.
For those with a battery, the app gives you even more control. You can see its charge level and decide when to draw power from it. Our guide to understanding home battery backup systems dives deeper into making the most of your energy storage. From day one, this monitoring capability empowers you to make smarter energy decisions and ensure your system delivers maximum value for years to come.
Your Solar Installation Questions, Answered
Deciding to go solar is a big move, and it's only natural to have a few questions swirling around. Even with a solid plan in place, we find that most homeowners have similar queries pop up as they get closer to committing. We've put together some of the most common ones we hear to give you the clarity and confidence you need.
How Long Does the Actual Installation Take?
While the whole process from signing on the dotted line to flipping the switch can take a few weeks—thanks to permits and grid approvals—the physical installation itself is incredibly efficient. You won't have a construction crew camped out on your property for ages.
For a standard residential system, like the ones you see all over suburbs like Glen Iris, the team is usually in and out in just one to two days. Things like a particularly complex roof, a very large system, or even Melbourne's unpredictable weather can sometimes push it to a third day, but it’s a remarkably quick process.
What Kind of Ongoing Maintenance Is Involved?
Honestly, one of the best things about modern solar systems is how little you have to think about them. They’re built tough and designed to be pretty self-sufficient, quietly pumping out clean energy for decades with minimal fuss.
Most of the time, regular rainfall is all that’s needed to wash off the dust and grime that naturally builds up. That said, to make sure your system is always running safely and at its peak, we do recommend a professional check-up every year or two.
This isn’t a major overhaul. It’s a quick health check that includes:
- A visual inspection of the panels for any damage.
- Checking all the wiring and connections to ensure they're tight and secure.
- Testing the inverter to confirm it's converting power correctly.
- Making sure all the mounting hardware is still rock-solid.
Think of it as a small bit of preventative care to protect your investment and ensure you're getting every last kilowatt-hour out of your system for years to come.
Will Solar Panels Actually Increase My Home's Value?
Without a doubt, yes. All the research and real estate trends point in the same direction: homes with solar panels sell for more. Buyers today are smarter than ever about long-term running costs and sustainability, making a solar system a huge drawcard.
A quality solar system is more than just an add-on; it's a genuine investment in your property's market appeal. It tells potential buyers this is a modern, energy-efficient home with lower bills—a massive advantage in a competitive market.
So, you not only get your money back through years of energy savings but also stand to gain from a higher sale price when it’s time to move on.
Can Solar Panels Be Installed on Any Roof?
Pretty much! Most common Aussie roofing materials—tile, metal, and composite shingles—are perfect for solar. Professional installers use specialized mounting gear designed for each specific roof type, guaranteeing a secure and totally watertight fit.
The real kicker, though, is the age and condition of your roof. If it's getting on in years, has a few cracked tiles, or shows signs of structural weakness, those issues need to be sorted before any panels go on. Some materials, like slate, also require very specific techniques and might not be suitable for every project. Any reputable installer will insist on a thorough roof inspection before finalising the plan.
The sheer growth of rooftop solar is proof of how adaptable it is. As of the first half of 2025, Australia had a staggering 26.8 gigawatts (GW) of rooftop solar capacity installed. That figure alone shows just how many homes and businesses are successfully making the switch. You can dive deeper into the data in the Clean Energy Council's report.
Building energy efficiency into your home's DNA from day one creates a seamless, high-performing result. If you're planning a new build, extension, or a major renovation, get in touch with Envy Abode. Let's talk about how we can help you create a home that’s modern, beautiful, and brilliantly energy-smart. Find out more at https://envyabode.com.au.