How to Read House Plans: A Complete Guide for Home Buyers in Carnegie

When you unroll a set of house plans for the first time, it can feel a bit like you’re trying to crack a secret code. The key to learning how to read house plans is to start by identifying what each document is for—the site plan, floor plans, elevations, and so on. Getting your bearings first gives you a clear roadmap before diving into the finer details.
Your First Look at a Set of House Plans
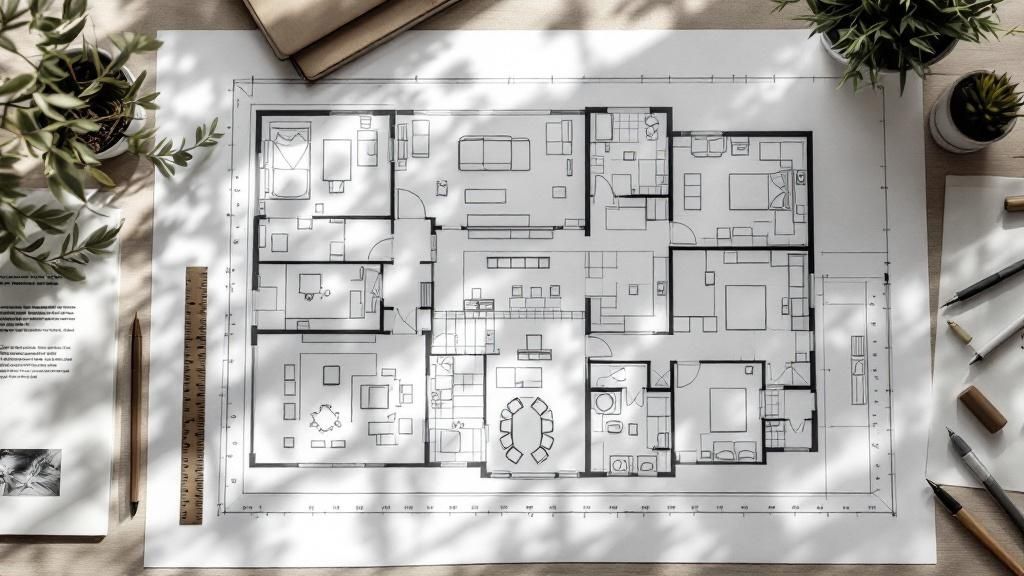
Staring at a full set of architectural drawings is the first tangible step in turning your vision into a real, physical structure. Before you get lost trying to interpret every single line and symbol, the best approach is to simply get familiar with the different sheets and what each one shows. Think of it like opening a new book – you’d glance at the table of contents first to see how the story is organised.
A complete set of plans is so much more than the main layout. It’s a whole collection of documents that, when pieced together, give you the complete picture of the project. For any new build or major renovation, especially in a place like Carnegie, these documents are the single most important communication tool between you, your designer, and your builder.
What Documents Make Up a Set of Plans?
Typically, you'll find several key documents, each with a unique job in telling your home's story. Your first priority is just getting a feel for these different sheets.
- Cover Sheet: This is your starting point. It contains the project name, address, your designer’s details, and a full list of all the drawings included in the set.
- Site Plan: This drawing gives you a bird's-eye view of the entire property. It shows you the property lines, setbacks, where the home will sit on the block, driveways, and sometimes even landscaping or topographical data.
- Floor Plans: Probably the document you’re most familiar with, this shows the layout of each level of the house from above. It details room dimensions, wall locations, doors, windows, and built-in fixtures like cabinetry and appliances.
- Elevations: These are 2D drawings showing what the home’s exterior will look like from each side (north, south, east, and west). They show off the finished look, including materials, rooflines, and window styles.
- Sections: A section drawing is like a vertical slice right through the house. It reveals all the internal details you can’t see on a floor plan, such as ceiling heights, different floor levels, and how the roof is constructed.
Knowing your way around these documents is absolutely crucial, especially in a dynamic housing market. Proper planning ensures your project doesn't just meet your personal needs but also the demands of the market—vital when you're making such a significant property investment in Carnegie.
The Bigger Picture
This skill is invaluable, not just for the build itself, but for truly understanding a property's potential. As Australia’s housing market continues to expand, being able to confidently interpret plans becomes even more important.
Consider this: in one recent month, 16,580 new residential dwellings were approved across the country, with later figures showing a 3.2% rise to 15,212 total approvals. This sheer volume of activity highlights just how critical clear and accurate architectural documents are for guiding construction effectively. You can read more about recent trends in Australian housing approvals to get a better sense of the market context.
Decoding the Language of Lines and Symbols
At first glance, a house plan can look like a confusing mess of lines and hieroglyphics. But think of it like learning a new language. Once you get the hang of the vocabulary, every line and symbol starts to tell a story about how the home will look, feel, and function. This is your personal translator for Australian architectural drawings.
Let's start with the most basic element: the lines. They aren't all created equal. Each one has a specific weight and style for a reason. As a rule of thumb, thicker, solid lines almost always represent walls, forming the core structure of the home.
You'll quickly see that even wall lines vary. The thickest lines typically show the structural walls—the ones holding everything up. Thinner lines are often used for internal partition walls, which are simply there to divide rooms and don't carry any load.
Identifying Key Structural Elements
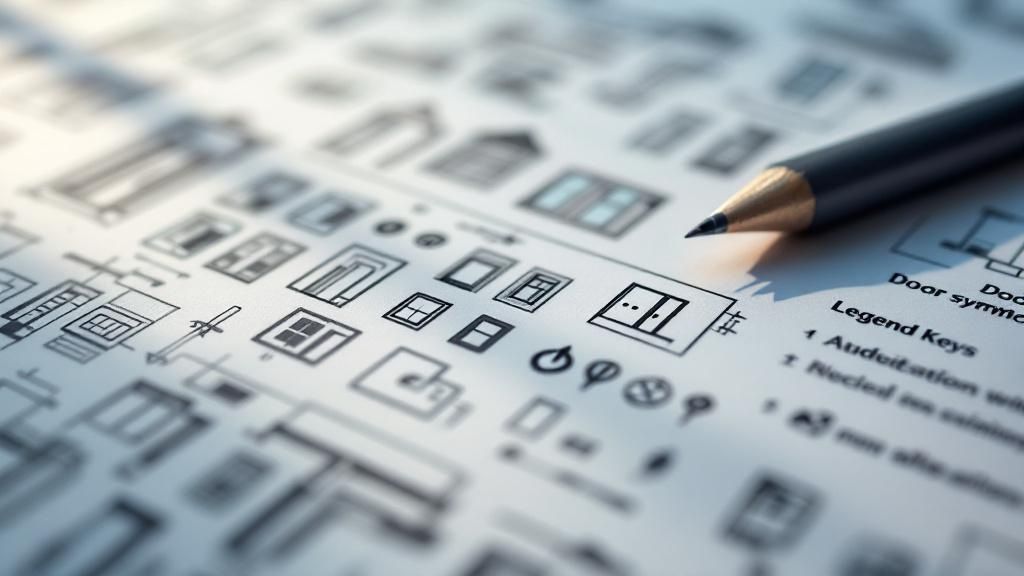
Getting a feel for the walls is a great start, but the real magic happens when you start to recognise the symbols. These little icons bring the plan to life, showing you everything from which way a door opens to where you’ll plug in your coffee machine.
Doors and windows have their own visual shorthand. You'll see a straight line with a curved arc, which shows not just a door but its swing direction—a critical detail for figuring out furniture placement and how you'll move through a room. Windows are usually shown as a thin rectangle sitting within a wall, sometimes with extra lines to show if they are fixed, sliding, or casement style.
For a deeper look into all the nuances, our guide on how to read architectural drawings is a fantastic resource.
The goal here is to stop seeing lines on a page and start picturing the actual, three-dimensional space. Being able to spot a poorly placed door that will constantly hit a bed, or a living area that lacks natural light before a single brick is laid, is an incredibly powerful advantage.
Understanding Utility and Service Symbols
Beyond the walls and windows, floor plans are peppered with symbols for all the services that make a house a home. These are the small icons representing electrical, plumbing, and mechanical systems.
Learning to spot these is essential for practical, day-to-day living. Knowing where your power points are planned helps you map out your home office or decide where bedside tables can go. Likewise, identifying plumbing fixtures gives you a clear picture of the layout in wet areas like bathrooms, laundries, and kitchens.
To help you get started, I've put together a quick reference table with some of the most common symbols you'll find on Australian house plans.
Common Australian Floor Plan Symbols
This table is a great starting point for decoding the most frequent symbols you'll encounter.
Symbol Category | Example Symbol | What It Represents |
Doors & Windows | A line with a curved arc | A single-swing hinged door, showing its opening path. |
Plumbing | A circle inside a square | A floor drain, typically found in bathrooms or laundries. |
Electrical | A circle with two parallel lines | A standard double General Power Outlet (GPO). |
Fixtures | An oval shape | A basic representation of a freestanding bathtub. |
Getting familiar with this visual language means you can scan a floor plan and instantly understand not just the layout, but how all the integrated services work together. It’s a vital skill, whether you're building a new dream home in Carnegie or planning a renovation on your current property.
How To Interpret Scale And Dimensions
This is where the magic happens. Learning to read the scale on a set of plans is the skill that turns all those lines and symbols on a page into a real, tangible structure you can actually visualise. It’s what lets you know for sure how big your future living room will feel, or whether that king-sized bed will truly fit in the main bedroom without cramping the space. Honestly, without a solid grasp of scale, you're just guessing.
You'll usually find the scale noted in the title block of the drawing, presented as a ratio like 1:100 or 1:50. Think of this ratio as a simple instruction: every one unit of measurement on the page represents a hundred (or fifty) units in real life.
For instance, at a 1:100 scale, one centimetre on the drawing translates to 100 centimetres (or one metre) in the actual build. This is a common scale for overall floor plans because it allows the entire home to fit neatly on one sheet. For more detailed areas like kitchens and bathrooms where every millimetre counts, you'll often see a 1:50 scale. Here, one centimetre on paper equals 50 centimetres in reality, giving you a much closer look.
Working With Scales
You definitely don't need to be a mathematician to figure this out. The most straightforward method involves using a scale ruler, a special triangular ruler with different scales marked right on its edges. You just find the side that matches your plan's ratio (e.g., 1:100), place it on the drawing, and you can read the real-world measurement directly. It’s that simple.
No scale ruler? No worries. A standard ruler and a bit of basic maths will get you there.
- Measure a line on your plan in millimetres.
- Multiply that number by the second number in the scale ratio (so, by 100 for a 1:100 scale).
- The result gives you the real-world size in millimetres.
For example, if a wall measures 50mm on your ruler on a 1:100 plan, its actual length is 50 x 100 = 5000mm, or 5 metres.
While using a ruler is great for a quick gut check, I have to stress this: professionals always rely on the written dimensions on the plan. Those numbers are the single source of truth. Paper can stretch, and digital plans can be resized by mistake, but the written dimensions are final.
Reading Dimension Strings
A far more precise way to understand your future home's layout is to read the dimension strings. These are the lines marked with numbers that run alongside walls and other features. They provide the exact measurements—usually in millimetres—so you don't have to pull out a ruler at all.
These strings are layered to give you different levels of detail. The string on the very outside might show the total length of one side of the house. The next one in could show the distance between major walls, while the innermost lines will pinpoint the exact sizes and locations of windows and doors.
Getting comfortable reading these is crucial for making sure the plan matches your vision, long before you get to the approvals stage. For more on why these details are so important early on, our article on the building plan approval process is a great resource.
By focusing on these written dimensions, you can confidently discuss layouts, plan your furniture, and make sure every part of your new Carnegie home is perfectly sized for you and your family.
Visualising the Home with Elevations and Sections
While floor plans give you the essential bird's-eye view, they only tell part of the story. To truly understand how a house will look and feel, you need to dig into the elevations and sections. Think of these drawings as the next layer of detail, working together to build a complete three-dimensional picture in your mind. They move you beyond flat layouts to reveal the home's real character and form.
Elevations are your first look at what the house looks like from the outside. You’ll typically get four of them, one for each face: north, south, east, and west. These aren't just simple outlines; they're packed with details that define the home's external appearance and street appeal.
This is where you'll see the specific materials chosen for the exterior—like brick, render, or cladding. Elevations also clearly show the roof pitch, the style and placement of every window and door, and any architectural features like verandas or decorative trim. They’re all about the outside impression.
Slicing Through the Design with Section Views
If elevations show you the outside, section drawings reveal the inside story. Imagine taking a giant knife and cutting the building in half to look at the cross-section. That’s precisely what a section drawing gives you.
These views are absolutely critical for understanding the home's volume and internal structure. A section drawing will tell you crucial information that a floor plan simply can't, including:
- Ceiling heights in different rooms and how they might vary.
- Floor level changes, such as sunken living rooms or split-level designs.
- The internal roof structure and how it impacts the space below.
- Staircase construction and, importantly, the headroom you'll have.
This infographic simplifies the core principle of turning drawing measurements into real-world dimensions.
The process shown here—identifying the scale, measuring, and converting—is fundamental. But when you apply it to elevations and sections, you gain a much richer understanding of the final home.
How Elevations and Sections Work Together
The real skill in reading house plans comes from using these different views in tandem. For instance, you might look at the front elevation and see a beautiful, large window. You can then flip to the corresponding section drawing to see how high that window sits from the floor and what the ceiling height is in that room. It connects the dots between outside style and inside feel.
This combined approach helps you answer important questions:
- Will the living room feel grand and airy or cozy and intimate?
- How much natural light will a bedroom actually get?
- Does that dramatic roofline create an interesting vaulted ceiling inside, or is it just for show?
When you can mentally stitch the floor plan, elevations, and sections together, you are no longer just looking at lines on a page. You are truly visualising your future home, from the way it greets you from the street in a suburb like Carnegie to the sense of space you'll feel walking through each room. This comprehensive understanding is key to avoiding surprises during construction and ensuring the final result perfectly matches your vision.
A Practical Walkthrough of a Sample Plan
Okay, theory is one thing, but getting your hands dirty (figuratively, of course) is where you really start to build confidence. Let's pull all this knowledge together and walk through a sample Australian house plan, just as if you were sizing up a project for your own block in a suburb like Carnegie. This is the best way to develop a repeatable process you can use for any design that comes across your desk.
Every project begins with the site plan, so that’s our first stop. This is your initial checkpoint for how the home sits in its environment. Your first task? Find that north arrow. See how the home is positioned on the land. Are the main living areas oriented to capture that beautiful, consistent northern sun? Have the windows been placed thoughtfully to maximise light while minimising any awkward overlooking from the neighbours?
From Site to Space
Once you’ve got a handle on the home’s placement, it’s time to dive into the floor plan. This is where you’ll spend most of your time, really digging into the layout and trying to imagine what it feels like to live there. Start by tracing the main pathways in your mind—from the front door to the kitchen, the garage to the living room, and the bedrooms to the bathroom.
This simple exercise is all about judging the home’s “flow.” Does the layout feel natural and logical? Or are you forced to navigate around awkward corners and down long, dead-end hallways? A truly well-designed home should feel effortless to move through.
Now, bring in the practical side of things using the dimensions you learned to read. Get a feel for the room sizes. Will your current sofa actually fit in that living room? Is there enough space around the dining table for people to pull out their chairs and walk past comfortably? Don’t just glance at the numbers; try to visualise what they mean in the real world.
Identifying Red Flags and Opportunities
As you go, keep your eyes peeled for common red flags. These are often small details on paper that can become major frustrations once the walls are up and it’s too late to change them.
- Awkward Door Swings: Check that doors don’t open directly into high-traffic walkways or, worse, crash into other doors. A poorly placed door can make an otherwise decent room feel tight and clumsy.
- Inadequate Natural Light: Be wary of rooms with only one small window or those that are completely overshadowed by other parts of the house or neighbouring properties.
- Poor Traffic Flow: Think about those "desire lines"—the natural paths people take. A classic example of poor flow is a kitchen island that blocks the direct route between the sink and the fridge.
Getting this review right is more important than ever, especially when you look at the current housing market. The National Housing Supply and Affordability Council recently pointed out that with the median dwelling value in Australia jumping 6.55% year-on-year to AUD 815,912, meticulous planning is absolutely crucial to protecting your investment. You can get more details from the council’s State of the Housing System report.
Finally, check the elevations to get a complete picture of the home’s street appeal. Do the proposed materials and rooflines create the look you’re after? This is the last piece of the puzzle, connecting the internal function with the external form. If you’re feeling inspired by what’s possible, you might want to explore some of the latest modern luxury house plans for fresh ideas.
By following this kind of practical walkthrough, you’ll be able to assess any set of plans with a critical eye and real confidence.
Common Questions About Reading House Plans
Even after you've got the basics down, it’s completely normal to have a few questions pop up when you’re looking at a set of house plans. Getting your head around the different types of drawings or knowing the right time to speak up can genuinely save you from some costly headaches down the track.
Let's walk through some of the most frequent queries we hear from clients, especially when they're reviewing plans for a project in a suburb like Carnegie. Clearing these things up early makes the whole process with your designer and builder run that much smoother. It’s all about feeling confident enough to ask the right questions.
Architectural vs. Structural Plans
One of the first things that can trip people up is the difference between architectural and structural plans. At a glance, they can look pretty similar, but they have completely different jobs.
- Architectural Plans are all about the design, the look, and how the home functions. These are the drawings we've mostly been talking about – they show you the room layouts, dimensions, where the windows go, and the overall feel of the house.
- Structural Plans, on the other hand, are drawn up by an engineer. They're the nitty-gritty details, the "bones" of your home. These plans specify things like the foundation design, what size beams to use, and all the critical elements that make sure the building is safe, stable, and meets all the building codes. You absolutely need both to build.
I always tell clients to think of it this way: the architectural plans are the what and the where, while the structural plans are the how.
Finding Your Bearings and Making Changes
Another detail that's small but incredibly important is your home's orientation on the block. Look for the north arrow on the site plan – it's usually just a simple circle with an arrow pointing to 'N'. This little symbol is vital because it tells you how your home will sit in relation to the sun, which affects everything from natural light in your living areas to your home’s overall energy efficiency.
A question we get asked all the time is, "Can I request changes after the plans are finalised?" The short answer is yes, but it’s often a gateway to more costs and major delays. It's always, always better to get everything right before construction kicks off.
Making a last-minute cosmetic tweak might be easy enough, but anything more substantial often requires a formal plan variation. This can mean going back to the drawing board with the designer, paying extra fees, and sometimes even resubmitting plans to the council for another approval round. That can add weeks, if not months, to your timeline.
It’s crucial to understand the full financial picture. Exploring a detailed home building cost breakdown can give you some really valuable context here. Honestly, your best strategy for a stress-free build is to pore over every single detail before you sign off on those final plans.
At Envy Abode, we guide you through every detail of your house plans to ensure your vision is perfectly captured before construction begins. Start your journey to a bespoke luxury home with us today.